

I gave a nod a few week’s back to the best manicure I’ve ever had: courtesy of Sophia at Cowshed Carnaby Street – read about it it here. Everything was just so neat and stayed looking just-done for almost a week, which meant for a whole seven days I had a case of the ‘new nails’ and was unable to pull my gaze off them for more than a minute. The mani was that good. But it got me thinking. I’ve got the tools already at home – could I pull it off myself? It was time to put my elephant-like brain in to action and remember each step so I could re-create the regime at home and so I did and success – my mani has never looked better if I say so myself (well, aside from when Sophia did it, she’s got the skillz). Here it is; 10 steps to the ultimate at-home, but looks like it was done in-salon, DIY manicure:
1) Bye, Bye Polish. It’s an über boring start because before you get down to the good stuff, you’ve got to wave goodbye to the old stuff. Soak a cotton pad in your nail polish remover of choice – I love the Zoya Remove+ 3-in-1 – and get to work. Be thorough making sure you get rid of every single scrap of your old paint job.
2) Get Filin’. When your bed is bare it’s time to pull everything back into shape, giving your nails a trim if needed and filing off the tips for smooth edges. I had a really old pair of nail scissors that I can’t even remember how I came into possession of that didn’t even close properly, so recently I treated myself to a Tweezerman pair. As with all things Tweezerman I wasn’t disappointed. File-wise you’ve got to keep things going in one direction and be as soft and gentle as you can. I get to work with the Leighton Denny Crystal Nail File which never blunts and leads to less breakage.
3) Scrub those mitts. This is a step I usually skip at home, but for the full Sophia-experience, you’ve got to give your hands and lower arms a good scrub – right up to dem elbows. Nothing special, just use your usual body scrub, which for me is the Kiehl’s Creme de Corps Soy Milk & Honey Body Polish, then get massaging.
4) Cuticle Work. Tidying up those cuticles is the single most important step of the whole process. When they’re pruned and polished everything else just falls into place. Get yourself a little bowl of warm water, pop on a cuticle removing gel like the Deborah Lippmann one and then give your tips a quick soak for a few minutes. When simmered slightly remove and tease your cuticles back with the Elegant Touch Cuticle Tool. Sounds gross, is gross, but feels rather satisfying. Trim any excess with a clipper like the Tweezerman Cuticle Nipper – just be very careful. Cuticle care done.
5) Looking Buff. You don’t have to do this step every time you change things up on your nails, but a good buff every month or so will help keep things nice and fresh on the surface. Quick tip: I always find my mani to last way longer on a freshly buffed base. The Boots 4-Way Nail Buffer is a good’un.
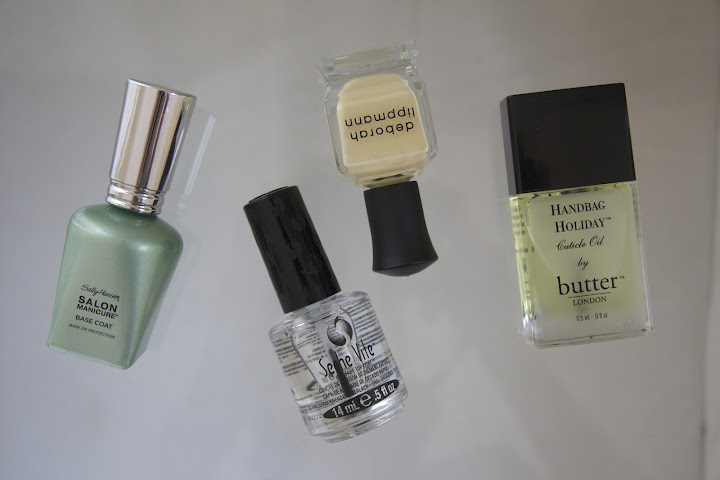
6) Feel the Base. Not only does a base help to grab onto your polish and keep it put for longer, it also prevents the nail bed from staining – I’m speaking from experience here. The Sally Hansen Salon Manicure Base Coat, not only sounds the part, but does a good job too. Slick on one layer, leave to dry and then move onto…
7) The Colour Layer. Now this is where I usually mess-up, but from watching Sophia’s application like a hawk I have a few notes to share with you. Firstly to get just the right amount of polish on the brush when you remove it from the bottle stroke one side of the brush on the neck of the bottle, flip it over and there you have the perfect amount of colour for one nail. Secondly it’s all about the cuticle – get as close as you can. Finally, you can’t forget the edges. Stroke the colour on in three dabs, one in the centre and one each on the right and left, then you’ve got everything covered. For the mani above I used the Deborah Lippmann Nail Polish in Build Me Up Buttercup.
8) Top It Off. A glass-like shinny top coat will finish off your lacquer sandwich nicely and they’ll always be a special place in my heart for Seche Vite. Fast-drying and long-lasting; gloop it on as thick as you like it and it will still be touch-dry in a matter of minutes.
9) The Tidy-Up. There are just three components to this simple trick: an orange stick, a cotton wool pad and nail polish remover and they come together to make a small gesture that makes a big difference. Grab your cotton pad, soak it in the remover and then fold it over the end of the orange stick. Use it to mop up any mani mishaps or misshapen cuticle work. An eyeliner brush dipped in remover will do the trick too if you’re feeling super fancy.
10) Moisturise, Moisturise, Moisturise. The finishing touch is to make those pinkies super soft. Apply any kind of oil you’ve got laying around onto your cuticles, though I’m a fan of the Butter LONDON Handbag Holiday Cuticle Oil mainly for the fact that it smells like Pina Coladas. Rub this all over palms if you don’t mind your fingers slipping all over your keyboard for the rest of the night, but if you fancy a fast-absorbing option try something like Sarah Chapman’s Overnight Hand and Nail Treatment and you’ll be tap, tap, tapping away in no time.
Happy painting!


Comments